Creating a valid CSV or TXT file and import profile.
Documentation Review Status
Last reviewed: July 2026
Reviewed and validated by the DPD Customer IT team.
Last reviewed: July 2026
Reviewed and validated by the DPD Customer IT team.
DPD Shipper enables you to import shipment orders, collection requests and receiver lists.
This allows you to process a whole lot of data in a fast way. For example, you can load the address file from other software into DPD Shipper and create hundreds of shipments at once.
To simplify bulk shipment and label creation, we provide a ready-to-use Excel import template.
This template is designed to be used for:
Classic B2B and B2C Importation Template
Product + Return Template
Shop return Template
DPD Shop Template
UK Template
When using this Excel template, you must select the import profile:
TEMP | Shipments Importation
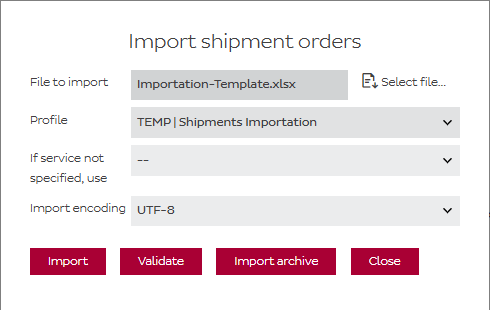
This profile is required to correctly map the template fields and process the import.
If you do not see this import profile in your DPD Shipper environment, it means it has not yet been activated for your account.
In that case, please contact our IT Customer Support team at:
it.cs@dpd.be
Our IT CS team will activate the import profile for you.
Source file format requirements:
Source file content requirements (minimum):
Other input is most recommended, but can be set to a default value default.
Example file:

Import profiles
The import profile basically tells Shipper how to interpret your file. It tells shipper which column of your Excel should be imported in which one of Shipper’s fields.
More info on how to create import profiles can be found below, or by clicking directly on their links in the right menu.
To be able to import you need an import file with all the details of your shipments.
DPD Shipper can import CSV and TXT files.
The following fields can be used when creating the import file for shipments.
| Field Length in character count | ||||
| Field types: M = Mandatory, C = Criteria, O = Optional | ||||
| delisid | 10 | string | O | To identify correct configuration for shipment orders assignment |
| recipient type | 1 | string | O | Type of recipient (B for B2B, P for B2C), default = P |
| recipient_name | 35 | string | M | Recipient name |
| recipient_name2 | 35 | string | O | An eventual second name of the receiver (specific department for example) |
| recipient_street | 35 | string | M | Recipient street. May also contain the house number. |
| recipient_house_no | 8 | string | C | House number of the recipient. Only mandatory if not included in recipient_street |
| recipient_street2 | 35 | string | O | Extra address info (such as building number) |
| recipient_zip | 9 | string | M | Recipient ZIP code |
| recipient_city | 35 | string | M | Recipient city |
| recipient_state | 2 | string | O | State within the recipient country (applicable for USA and Canada), e.g. CA for California |
| recipient_country | 3 | number | M | Recipient country (ISO 3166) |
| recipient_language | 2 | string | O | Language of notifications for recipient (EN, NL, FR, DE). Be careful: it has to be an actual language code and not a country code. BE of GB are not valid languages. NL, FR or EN are. |
| recipient_phone | 30 | string | C | Recipient telephone number in international format. Example: +32#4771234567. Mandatory for Express shipments. Also mandatory for B2C if no email is given. |
| recipient_email | 50 | string | C | Recipient e-mail address. Mandatory for B2C if no phone is given. |
| recipient_reference | 35 | string | O | Recipient reference number |
| recipient_information | 150 | string | O | Information/instruction for delivery to courier device (POD) to displayed |
| product | 10 | String | M | Internal product ID (B2B, B2C, PSD,…) |
| services | 255 | string | O | Internal IDs of all Services (COD, SWAP, SMS, 6, TYRE, IDC…) |
| parcel_count | 3 | number | O | How many parcels in your shipment, default:1 |
| parcel_volume | 9 | number | C | Parcel volume (length/width/height) in cm without separators; In case of different volume per parcel, separate vaIues by comma (,). Only mandatory for shipments outside the EU. |
| parcel_weight | 8 | number | M | Parcel weight in decagrams rounded in 10 without decimal delimiter (e.g. 300 equa Is 3 kg); In case of different weight per parcel, separate values by comma (,) |
| parcel_reference1 | 35 | string | O | Parcel reference number 1 |
| parcel_reference2 | 35 | string | O | Parcel reference number 2 |
| parcel_reference3 | 35 | string | O | Parcel reference number 1 |
| parcel_reference4 | 35 | string | O | Parcel reference number 2 |
| id_check_name | 35 | string | C | Not used. You can ignore this. |
| id_check_number | 35 | string | C | Not used. You can ignore this. |
| pickup_id | 7 | number | O | Delivery to PICKUP point, global reference number of place. |
| pickup date | 8 | string | O | Date in two supported formats yymmdd or yyyymmdd |
Attention! If you open the files in a spreadsheet application such as MS Excel, numerical values that start with 0 (e.g. telephone number) are usually converted so that the ‘0’ falls off. You can prevent this by importing the values as text instead of numbers.
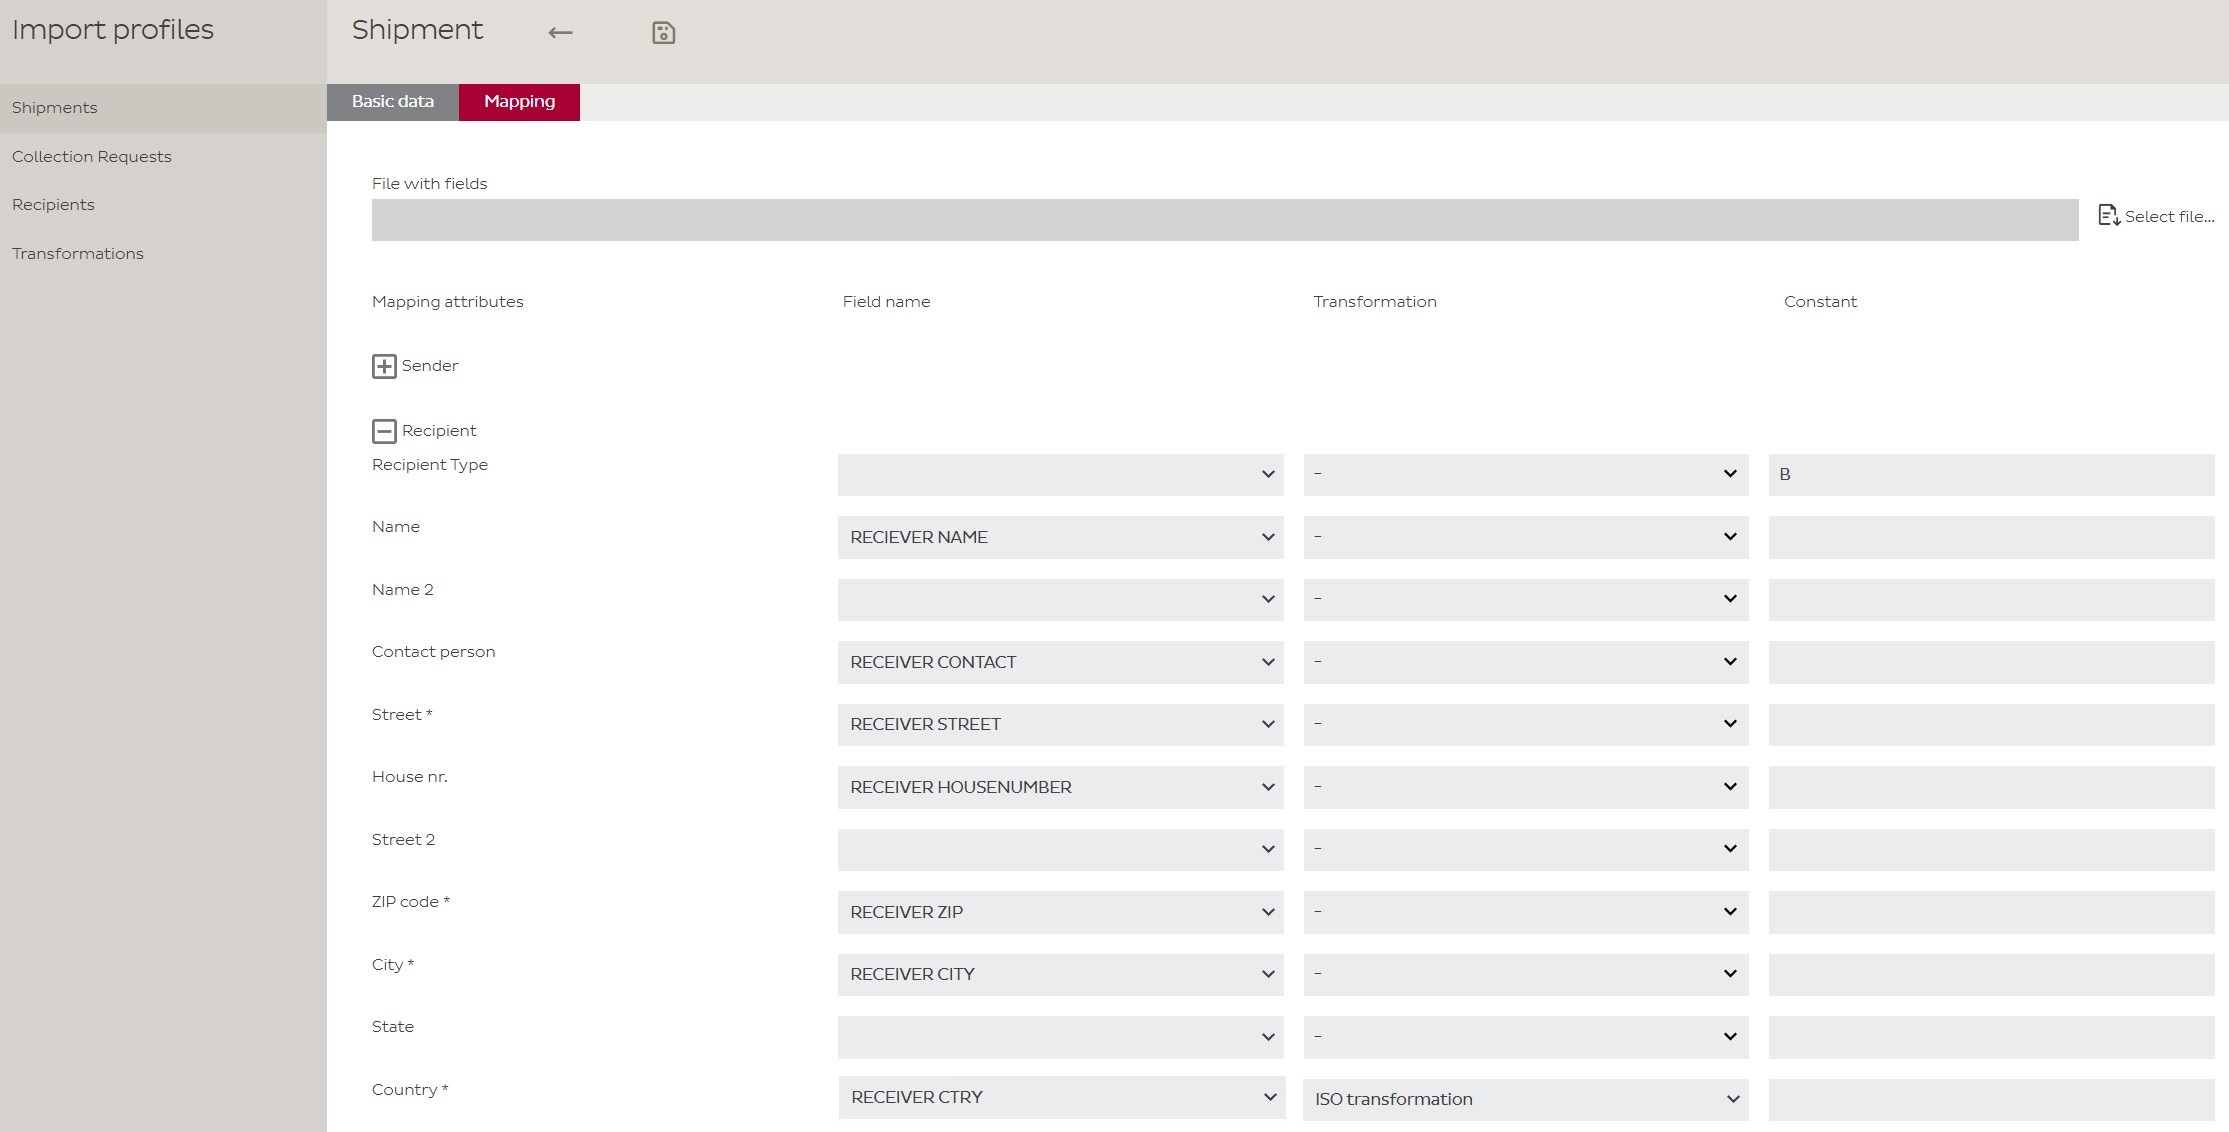
With the help of an import profile you can assign the columns in your import file to the fields that Shipper uses.
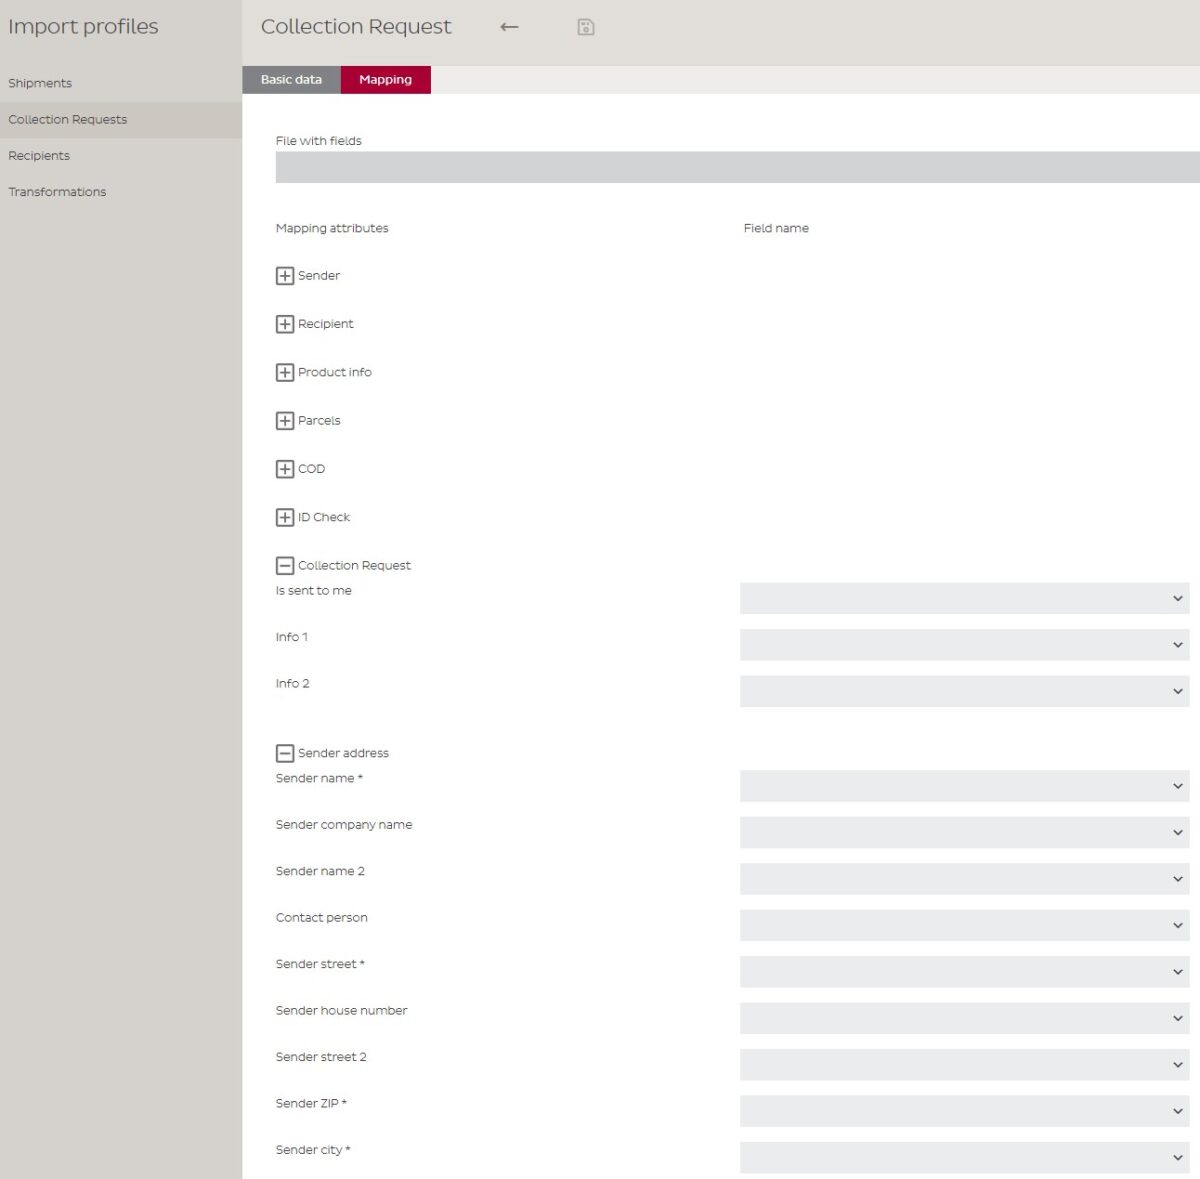
To create an import profile, go to “Import Profiles” on the left, choose between Shipments, Collection Requests or Recipients, and then click “Add”.

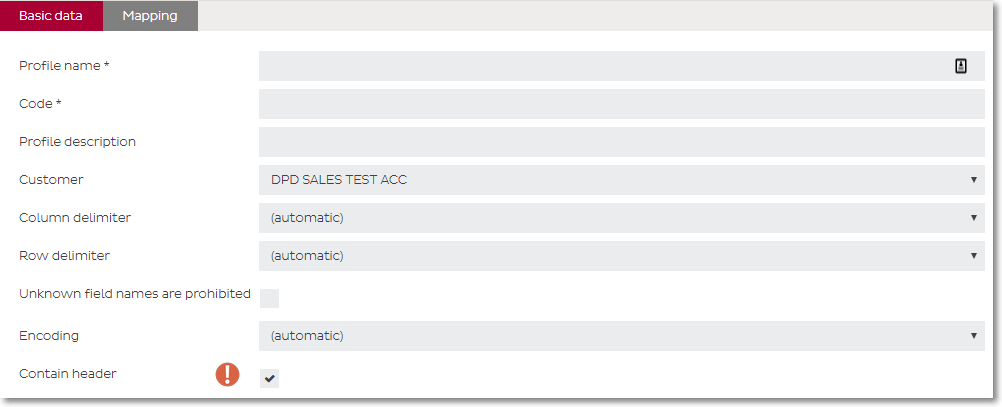
In the next screen you can enter the parameters of your file.
Profile Name: a free name you can give to your import profile. It doesn’t matter what you fill in but it can’t be blank.
Code: a free code you can give to your profile. As above, it doesn’t matter what, but it can’t be blank.
If your file does not contain a header line you must check this before you go to the next step!
You can leave most of the fields here automatically.
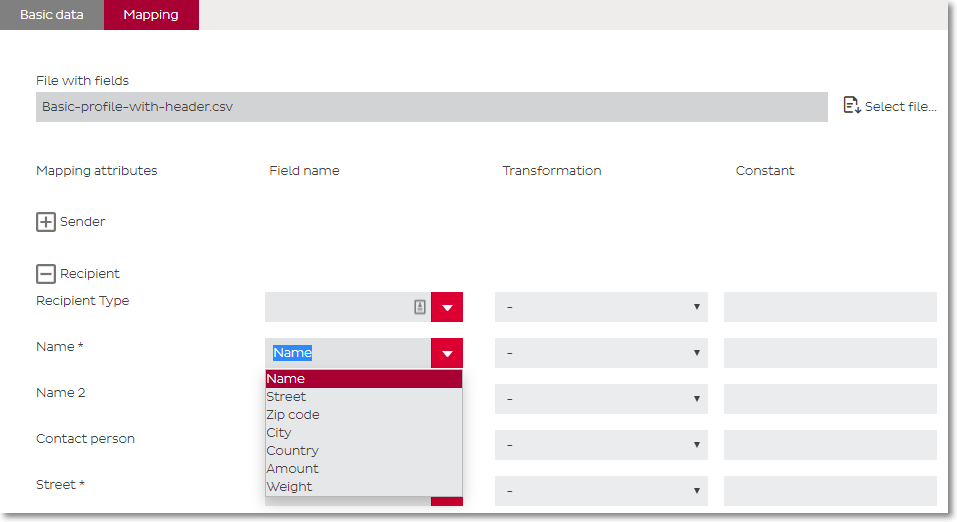
Once you have entered the parameters, click on assignment at the top. Here you can assign the columns to a field value.
To start, choose your import file file by clicking on “Select file …” and browsing to the Excel/CSV/TXT file you want to import.
There are 3 options for assigning fields:
Next, save the profile
It’s strongly recommended to make a backup of your import profiles, you can do so by going to Import Profiles –> Shipments and click on the Export button and saving the resulting CSV file.

Important notes
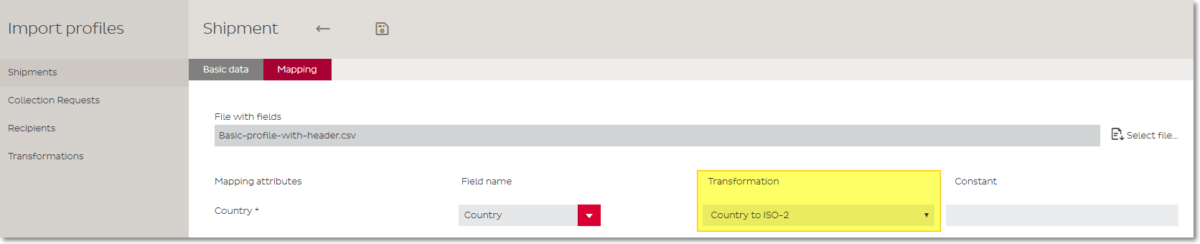
With the help of transformations you can convert values that are in your import file to values that DPD Shipper can use.
For example, imagine the country column in your import file are all written as “Belgium” instead of “BE”, you can set a transformation that tells Shipper to transform the value “Belgium” to “BE” when importing
To create a transformation, choose “Import profiles”, “Transformations” and “Add” in the left menu.
In the screen that appears you give your transformation a name and a code, a description is optional.
With the button “Allow unknown source values” you allow that values can also be imported that have not been converted.
At “Value mappings” you click on add to add values.
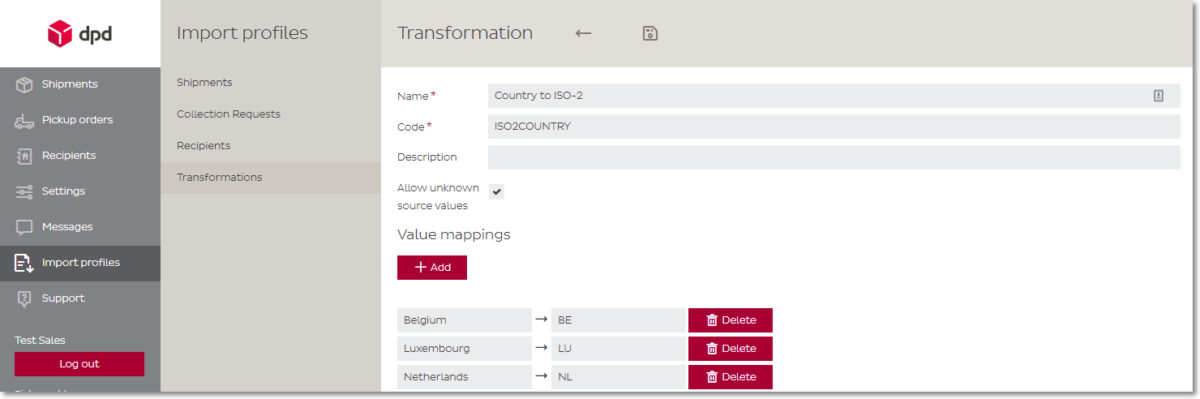
This screenshot for example shows a transformation where Belgium is converted to BE, Luxembourg to LU and Netherlands to NL.
When finished, click the Save button.![]()
Afterwards you go back to your created import profile to assign the transformation to the correct field.
This documentation builds on the above documentation in Importing
You will need a to describe each different item you have in your shipment. An object that has it’s own HS code makes up for a separate item. Keep in mind that it’s not possible to send multi-parcel shipments to the UK. You can only send single-parcel shipments. Your parcel can however contain multiple items.
It’s also only possible to send DPD Business and DPD Home shipments (regular B2B and regular B2C). Saturday, Collection Request, Express, Parcelshop, etc are not possible.
Other changes
Notes about EORI, HMRC and VAT number
In addition to the fields that are already needed for a proper import file, you will need to add several extra fields that are necessary for shipments to the UK. Here you will find an overview of these extra fields.
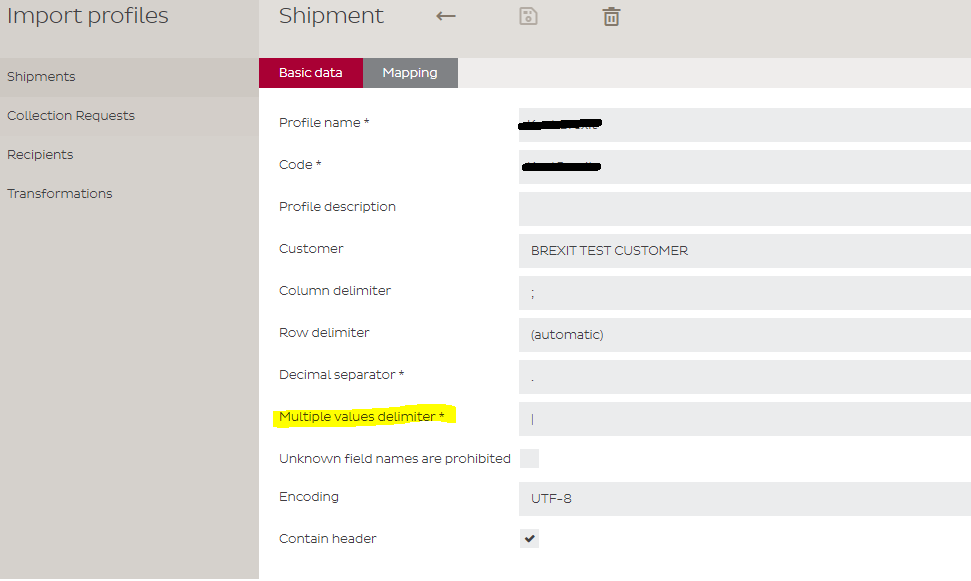
You’ll notice that you can give the details of your items too. If you have multiple different items in your parcel, you will have to separate the item details with a separator. Usually, a pipe is used ( | symbol).
Please note that for clarification, the fields starting with ITEM in the overview below are fields in which multiple values can be given with separator. These are the fields that describe each one of your different items.
| Field | Field Type* | Description |
| *Field types: M = Mandatory, C = Criteria, O = Optional | ||
| sender_eori_number | M | Sender EORI number |
| receiver_eori_number | M | Receiver EORI number. Please keep the points mentioned ealier on this page in mind. |
| sender_vat_number | M | Sender VAT number |
| receiver_vat_number | M | Receiver VAT number. Please keep the points mentioned ealier on this page in mind. |
| customs_terms | M | DPD only allows DAP so please set this value fixed to 06 |
| prealert_status | M | Please set this to fixed value 03 |
| exportreason | M | Please set this to fixed value 01 |
| parceltype | M | Please set this to fixed value P |
| invoice_number | M | Your invoice number |
| clearance_cleared | M | Please set this to fixed value F |
| invoice_currency | M | Currency of the invoice (ISO 4217, example: EUR or GBP) |
| ITEM_content | M | This item’s description |
| ITEM_weight | M | This item’s total weight. This is the weight of all of those items. |
| ITEM_hs_code | M | This item’s HS code |
| ITEM_value | M | This item’s total value. This is the value of all of those items. Value is two decimals, without komma. Ex: value 1450 = €14.5 |
| ITEM_count | M | How many of this item the parcel contains |
| ITEM_origin | M | This item’s country of origin (ISO 3166, example BE |
Extra info about import of multi-item shipments
Let’s assume you’re sending Paper Clips and Pencils. You’ll see in the 3rd parcel of the sample import file that each ITEM field has a pipe-separator:
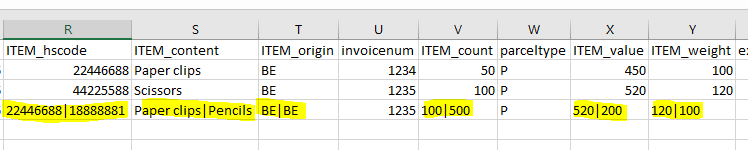
This means that you have two sets of items in this parcel:
Please also note that the combined weight of these two items is 2.2 kilo (1.2 + 1) which is also properly reflected in the total parcel weight field:
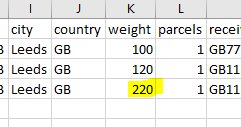
Concerning the separator: while this example uses a pipe as a separator ( | symbol), you can use a different one. The separator is determined in the Import Profile. We recommend using a pipe like in the example.
The way of working to import addresses is similar to importing shipments except for choosing an other type of import file from the menu to complete it.
Since a recipient has less parameters than a shipment, less mandatory fields apply.
Import profiles from shipments cannot be used import recipients and vice versa. You need two separate import profiles
The way of working to import addresses is not any different to importing shipments except for choosing an other type of import file from the menu to complete it.
Since a recipient has other important parameters than a shipment, new sections apply.
Import profiles from shipments cannot be used import collection requests and vice versa. You need two separate import profiles.
Attention:
Exceptionally, it is possible to ask DPD to generate the labels for you, based on an Excel file. However, please keep in mind this is not free of charge and has certain conditions attached to it. Any such requests must always come in via your Sales representative. The conditions can be consulted in the link below.
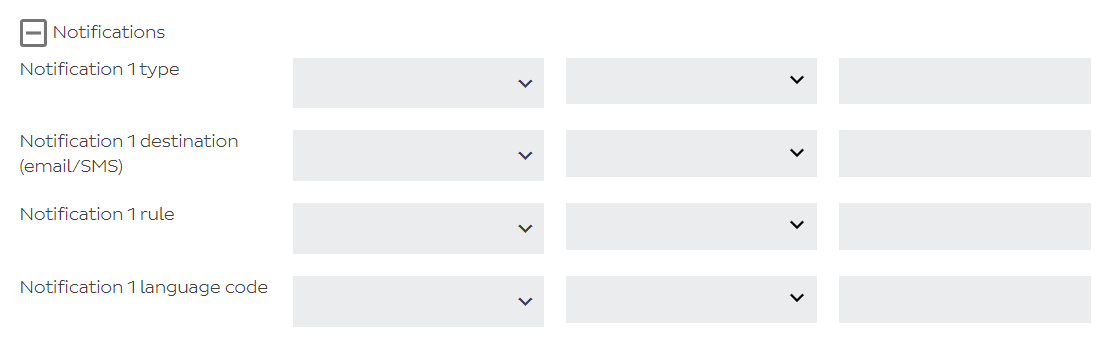
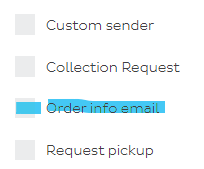
It’s indeed possible to import shipments where a Predict message is sent to the receiver. It’s mostly the same as importing shipments for the regular B2B service, but there are a few extra fields you will have to provide in your import file and map when making your profile (in the Notifications subsection):
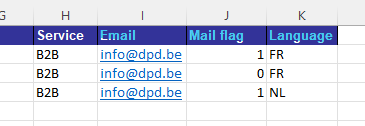
Please note that if your import file has a mix of B2C and non-B2C shipments, these four fields still need to be included for your non-B2C shipments, but just left blank. For example:

It’s important to note that there’s a difference between the above mentioned Predict messages and the regular Track & Trace email. This section is about the latter or in other words, importing shipments where this case is automatically checked:
It is indeed possible to tell the importing tool to mark that box for your shipments.
For this, you will have to add a column to your importfile and use value 1 for shipments where this box needs to be checked and value 0 for those who don’t. You will also need to add a column with the email address of the recipient and a column with the language in which the Track & Trace email must be sent, in ISO2 Code (EN, FR, NL, DE,…)
An example would be this:
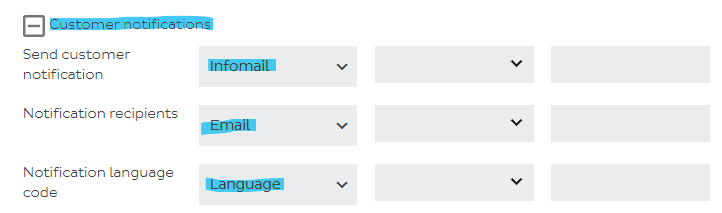
Next, you will have to link each one of these new columns to the correct field in your Shipper import profile, in the Customer Notifications section:
It would look like this with our example:
It’s also possible to set these fields with fixed values. For instance, if you want all emails to always be in English, you can set the third column up with fixed value EN.
As a final step, we recommend you link your email column with the Email field in the Recipient section too:

You can find a full example for download here.