The guide presumes that you have already installed and configure Magento 2
Magento 2
-
Installation
To install the magento2 DPD shipping plugin need to execute a few commands in your systems terminal, make sure however that your terminal is opend in the right folder.
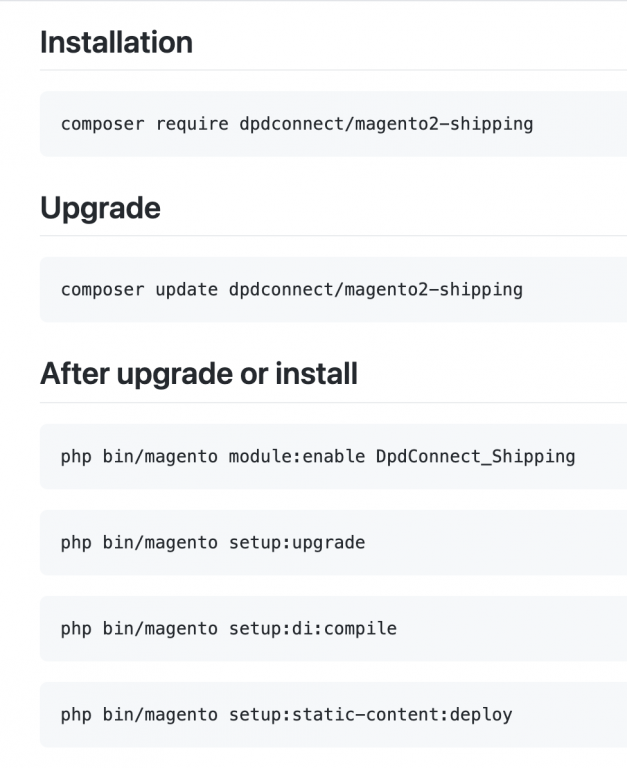
- composer require dpdconnect/magento2-shipping
- composer update dpdconnect/magento2-shipping
- php bin/magento module:enable DpdConnect_Shipping
- php bin/magento setup:upgrade
- php bin/magento setup:di:compile
- php bin/magento setup:static-content:deploy
-
Configuration
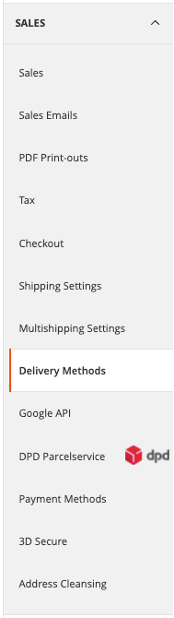
For the first part of the configuration go to Menu > Store > Settings > Configuration > Sales > DPD Parcelservice
Account settings
Go to the section Account settings, here you will need to fill in your DPD information and choose your preferred label size.
Shipping Origin
Next is the section Shipping Origin this is section is for sender data, fill out the name and address from where the package will be send.
Advanced
The advanced section handles a part of the plugin concerning small details non the less it should still be looked at and configured.
Default Content Type (Non domestic)
This setting is for customs whether to use Documents or NonDocuments service for non domestic shipments (Shipments within the EU are classed as domestic).
Include return label
If you enable this setting the DPD plugin will include a return label automatically when you generate a label for an order, if the setting is disabled you’ll have to manually generate a return label.
Picqer mode
If you enable this option the DPD Shop name will be added to the company field instead of the first and last name.
Save labels as file
If you enable this option the generated labels will be downloaded to as a PDF file, if the Return Label setting above is enabled it will be saved in the same file.
Store labels in
This setting is for changing where the labels will be stored. The default directory is ‘/var/dpd_labels’ in your Magento directory. Use full path if you want to use a custom directory.
Print phone & order Id on label
If you enable this one of these settings the enabled option will be printed on the generated DPD label.
Store information
This section will be used for shipping lists, make sure everything is filled out correctly otherwise you will get an error when you try to generate a label.
The last three options are for shipping internationally (Customs) if you don’t ship internationally don’t leave these three empty instead fill in a space, if you leave them empty you will get an error while generating a DPD label.
API settings
Async enable (Enable async webapi calls)
This option is for processing a large number of DPD labels in the background, if the DPD Connect API is busy making labels may take more time. If you don’t want to wait for the labels enable the option and your request will be queued so that it can return quickly.
Also if you make a large request while the DPD connect API is busy your request may take too long causing it to fail, with the option enabled it will again be queued so that it can quickly return.
Product attributes
In this section you can set the default product attributes and a Harmonized System Code.
Default harmonized system code
Among industry classification systems, Harmonized System (HS) Codes are commonly used throughout the export process for goods. The Harmonized System is a standardized numerical method of classifying traded products. It is used by customs authorities around the world to identify products when assessing duties and taxes and for gathering statistics.
-
Delivery methods
After configuring the DPD Parcelservice we can configure the Delivery Methods. In the small side navigation go to Sales > Delivery Methods.
There are a couple settings here that we need to configure
- B2C
- DPD Pickup
- DPD predict
- DPD Saturday
- DPD Pickup
- B2B
- DPD Clasic
- DPD Express E10 (before 10:00)
- DPD Express E12 (before 12:00)
- DPD Express E18 (before 18:00)
- DPD Business Saturday
Each service has the following fields.
- Enabled in checkout
- Title is the leftmost, boldface part of how the service will appear in step 4 of the check-out page of your shop. Both parts will be separated by a – (dash). The title of the service will also appear in the admin environment in the Orders list therefore it is important that you give each service you enable a different title.
- Method name
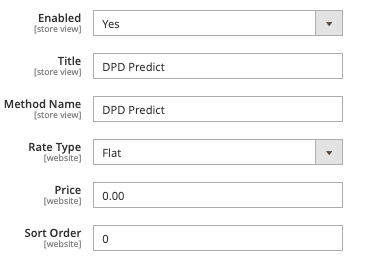
- Rate Type
- Price
- Sort order
- Displayed Error Message
DPD Predict
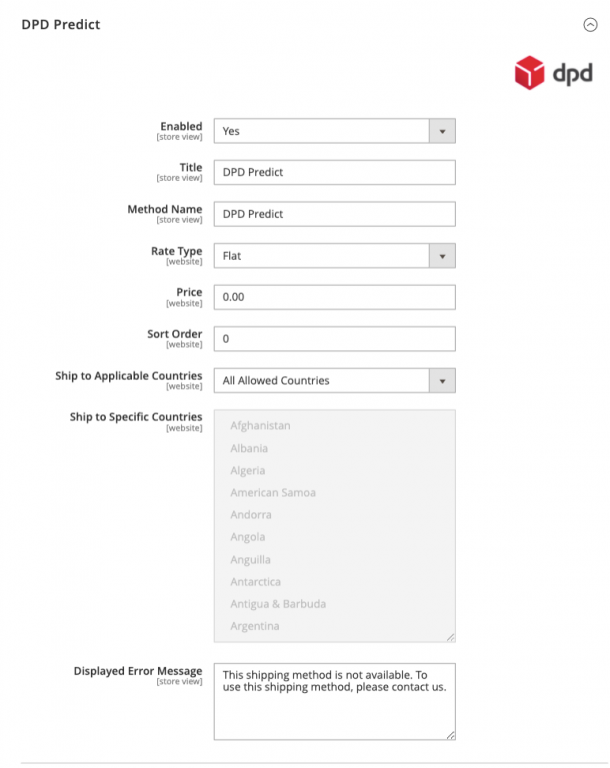
DPD Predict is the most common delivery service for costumers.
Most of the fields here are are explained above except for:
- Ship to Applicable Countries
- Ship to Specific Countries
If there is only one or a few countries you want or can ship to you can specify them here, switch ‘Ship to Specific Countries’ from ‘all allowed countries’ to ‘Specific Countries’.
Now you can specify them in the option below Ship to Specific Countries here you chooses specific countries.
DPD Pickup
DPD pickup lets the customer pick a parcel shop where they’ll collect the ordered product, if u want to use this serves you will need a Google maps server client key & Google maps server key.
All the fillable option were covered in the previous section(s) above except for:

- Google maps server client key
- Google Maps server key
- Map width
- Map Height
- Map – Max number of shops
In the checkout the pickup points can be selected from a map, based on the post code the pickup stores nearby are pre-filled in the map.
DPD Saturday
This section is for deliveries that arrive on Saturday, most of the fillable fields have been explained in the previous chapter(s) except for:
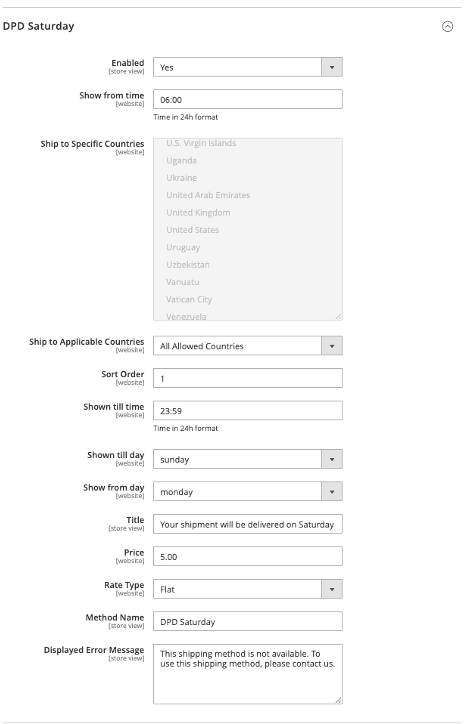
- Show from time – Configure from what time on the selected ‘day from’ the service will appear in step 4 of the checkout page of your shop. Please enter time in hours (0-21) and minutes (0-59) separated by a colon. The time will be interpreted in the context of the time zone of your server shown below the time entry field*. If you do not enter a time the service will not appear!
- Show till time – Until what time on the selected ‘day from’ the service will appear in step 4 of the checkout page of your shop. Please enter time in hours (0-21) and minutes (0-59) separated by a colon. The time will be interpreted in the context of the time zone of your server shown below the time entry field*. If you do not enter a time the service will not appear!
- Show from day – Select from which day of the week the service will appear in step 4 of the checkout page of your shop. If you do not select any day the service will not appear!
- Show till time – Until what time on the selected ‘day from’ the service will appear in step 4 of the checkout page of your shop. Please enter time in hours (0-21) and minutes (0-59) separated by a colon. The time will be interpreted in the context of the time zone of your server shown below the time entry field*. If you do not enter a time the service will not appear!
- B2C
-
Create shipment labels
If you have filled out everything field from the plug-in, we can go see how it works!
Make sure that you enabled all Delivery Methods as shown in the previous section.
Testing the checkout
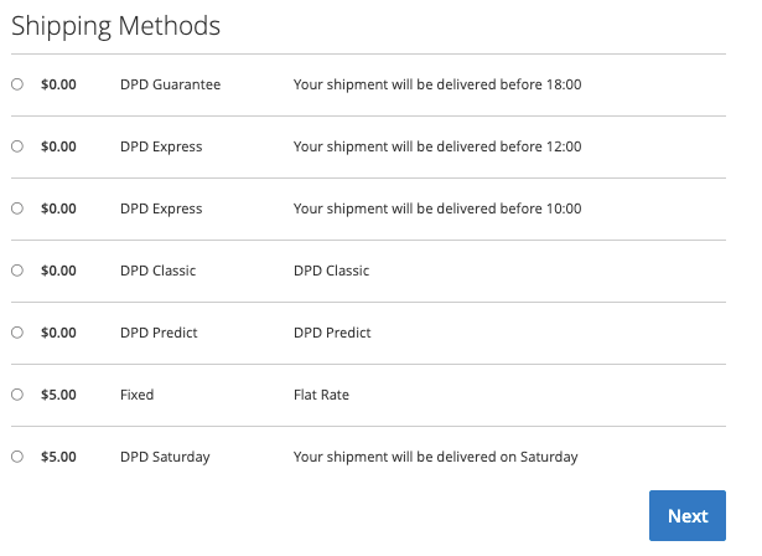
Go to a product in your web shop add it to your cart and go to the checkout. If you’ve enabled the previously mentioned Delivery Methods you will see that all the DPD-Delivery option are available.
Again if you don’t see the option make sure to check if you filled in everything correctly and check if you’ve enabled the Delivery Methods.
After selecting a delivery method complete the order so you can test the label generation in the next step, we recommend that you start with the most common method ‘DPD Predict’.
Generating labels
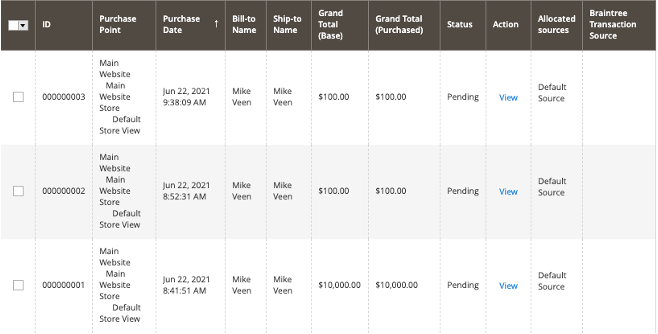
Once you have an order you can generate DPD labels for them if they chose a DPD delivery method, to generate labels go to Menu > Orders
Now that you see the screen above we can try generating labels for your stores orders, select one of the orders that you see by clicking the check box left of the ID. Once you have selected an order click the dropdown box that has default text of ‘actions’ above the previously mentioned check box(es), and select ‘create DPD shipments’ and click the option ‘OK’ after you see the pop up and the label(s) will start to download.